Engineering Guidelines
To contribute to this plugin, you need the following tools installed on your computer:
- Composer - to install PHP dependencies.
- NVM - to install the correct Node.js version.
- NPM - to install Javascript dependencies.
Since you need a WordPress environment to run the plugin, the quickest way to get up and running is to use the provided wp-env environment.
wp-env requires Docker to be installed. There are instructions available for installing Docker on Windows 10 Pro, all other versions of Windows, macOS, and Linux.
You can then clone this project somewhere on your computer and cd to the directory:
git clone git@github.com:ampproject/amp-wp.git amp
cd amp
Next, install the required version of Node using NVM:
nvm installThen, install the required Javascript and PHP dependencies:
npm install
composer install
Finally, build the assets:
npm run build:jsIn order to start the local environment, go to the plugin root directory and run the following command (note that Docker needs to be running beforehand):
npm run env:startwp-env will set up 2 independent environments for you:
-
developmentavailable at http://localhost:8888 (Username:admin, Password:password) -
testsavailable at http://localhost:8889 (Username:admin, Password:password)
They both share the plugin files but use separate databases. Thanks to that, changes introduced by PHPUnit or E2E tests will not affect the development environment.
If you wish to stop the local environment, use the following command:
npm run env:stopNote that the database will not be cleared when starting or stopping the environment. If you would like to clear the database you can run the following:
npm run env:reset-siteYou can also destroy Docker containers and volumes and start over by using:
npm run wp-env destroyIf you would like to use one of the wp-env CLI commands directly and you don't have wp-env installed globally, make sure to run the command via the npm script like:
npm run wp-env run cli bashYou can run WP CLI commands using the wp script like:
npm run wp user listThe commands will be run in the development environment. To run a WP CLI command in the tests container, use the wp-env command directly:
npm run wp-env run tests-cli wp user listPlease, refer to the @wordpress/env README for more information on how to use, extend, and troubleshoot wp-env.
Whether you use the pre-existing local environment or a custom one, any PHP code changes will be directly visible during development.
However, for Javascript this involves a build process. To watch for any Javascript file changes and re-build it when needed, you can run the following command:
npm run devThis way you will get a development build of the Javascript, which makes debugging easier.
To get a production build, run:
npm run build:jsThe branching strategy follows the GitFlow schema; make sure to familiarize yourself with it.
All branches are named with with the following pattern: {type}/{issue_id}-{short_description}
-
{type}= issue Type label -
{issue_id}= issue ID -
{short_description}= short description of the PR
To include your changes in the next patch release (e.g. 2.0.x), please base your branch off of the current release branch (e.g. 2.0) and open your pull request back to that branch. If you open your pull request with the develop branch then it will be by default included in the next minor version (e.g. 2.x).
All submissions, including submissions by project members, require review. We use GitHub pull requests for this purpose. Consult GitHub Help for more information on using pull requests.
All contributions to this project will be checked against WordPress-Coding-Standards with PHPCS, and for JavaScript linting is done with ESLint.
To verify your code meets the requirements, you can run npm run lint.
When running npm install, husky will automatically install a pre-commit hook which will run lint-staged.
By default Xdebug is started when running npm run env:start. Read more about Xdebug in wp-env.
See Gutenberg's Xdebug IDE Support docs.
When running Xdebug with PhpStorm, the PHP_IDE_CONFIG environment variable needs to be set. Running npm run test:php:xdebug will automatically include PHP_IDE_CONFIG="serverName=amp". This allows you to create a server with the name of localhost, and also using localhost for the host and providing port 8888:
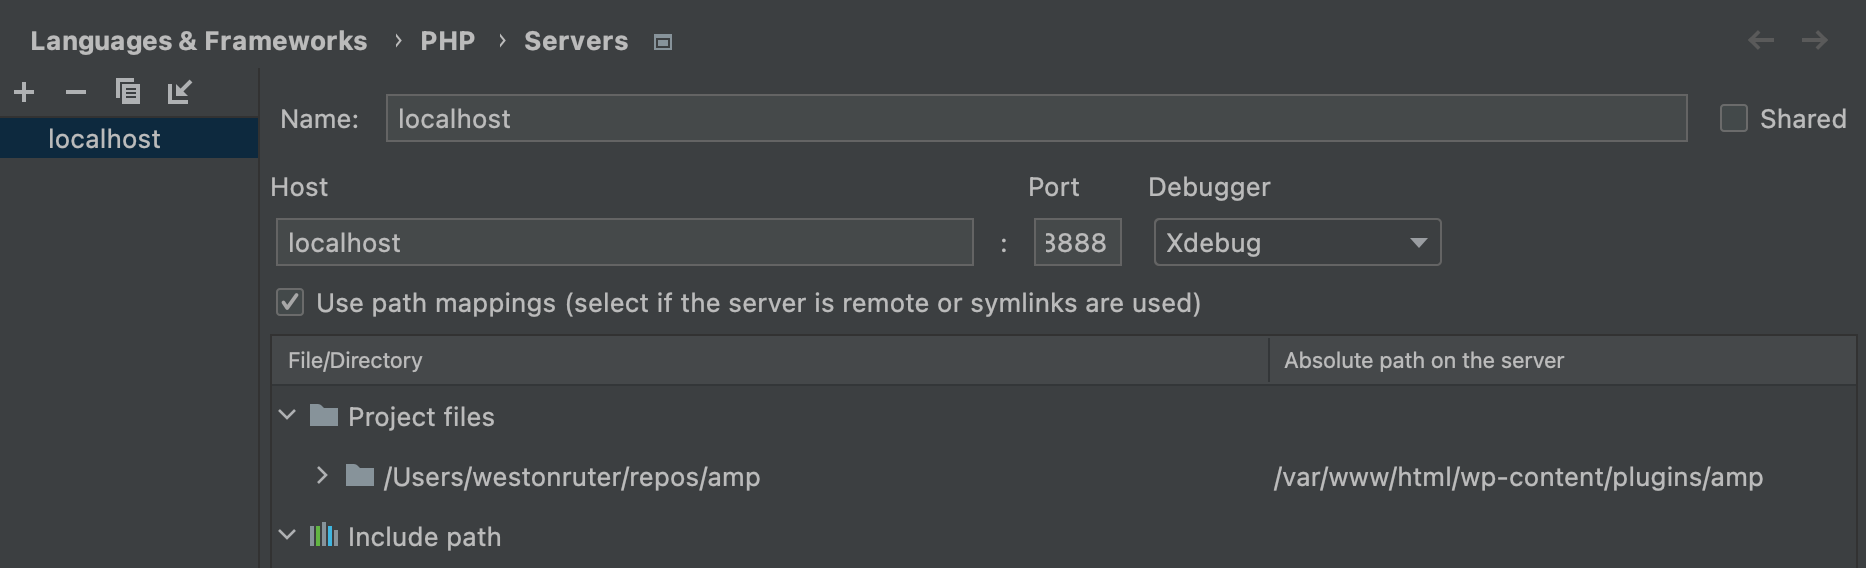
Path mappings should map /var/www/html/wp-content/plugins/amp to the repo on your filesystem.
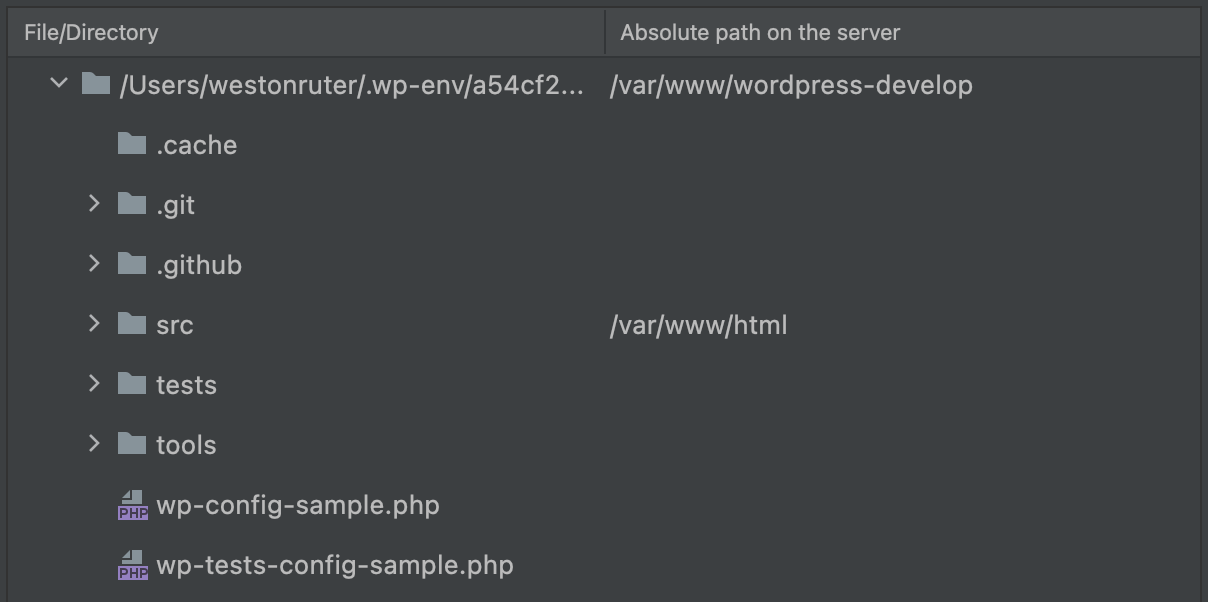
Then under Include path, map your install path (found via npm run wp-env install-path) to
/var/www/wordpress-develop, and then the src subdirectory to /var/www/html.
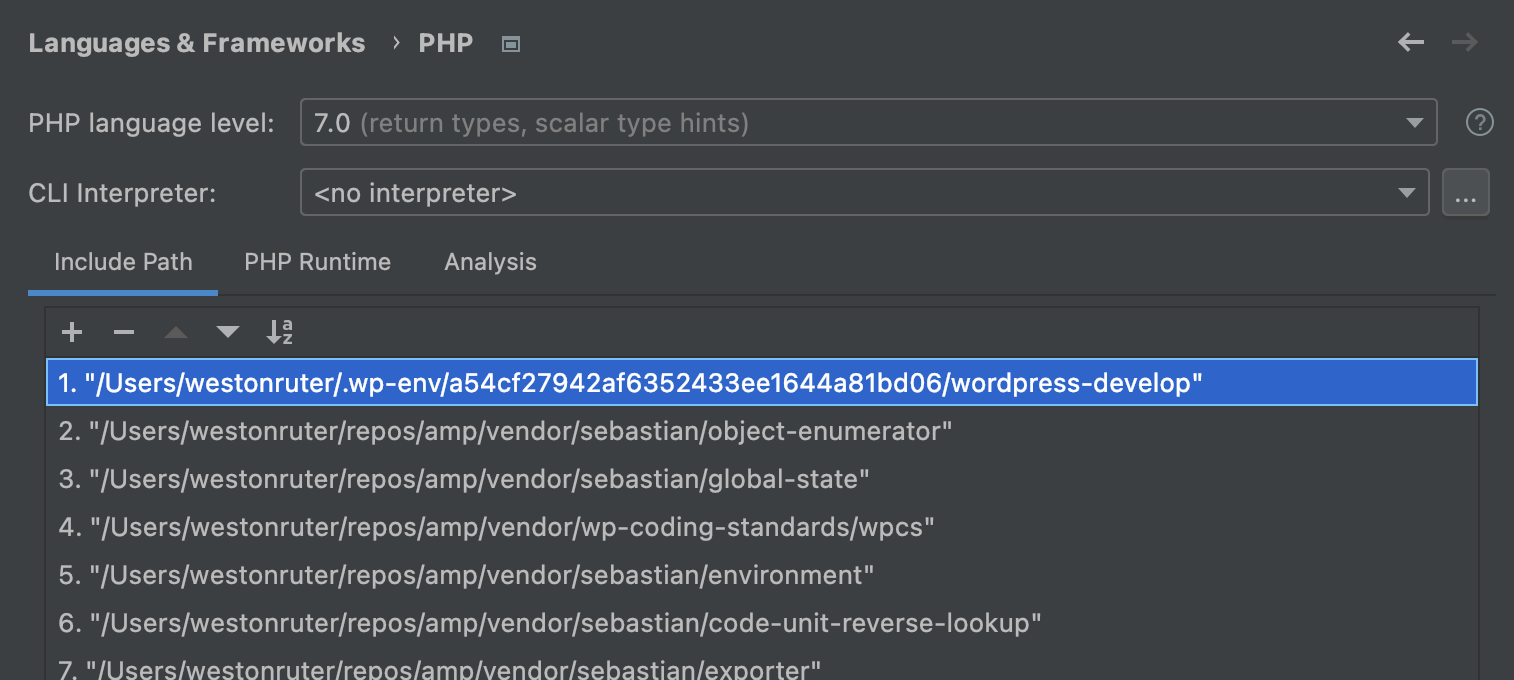
You'll want to make sure that this Install path is also included in your PHP Include Path:
The PHP Debug preferences may be configured as follows (which should be the default):
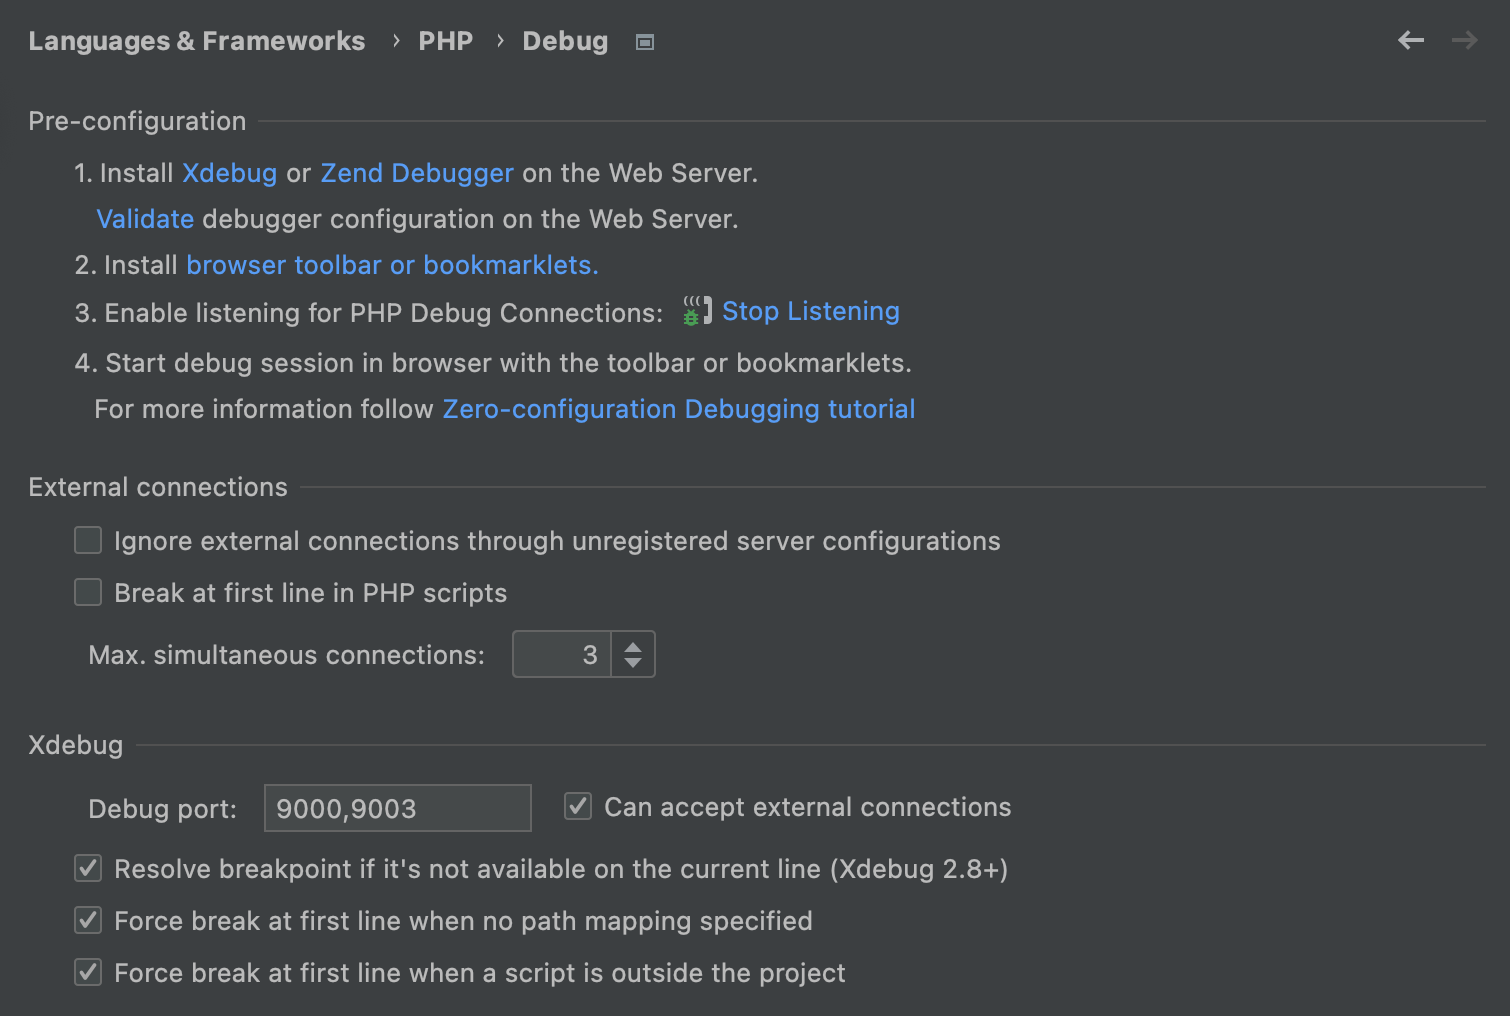
You now should be able to set a breakpoint and PhpStorm's debugger should pause once you've started listening for PHP Debug Connections via the telephone icon:

The debugger should be invoked both via web connections to http://localhost:8888 as well as PHPUnit runs via npm run -s test:php:xdebug (see below).
The AMP plugin uses the PHPUnit testing framework to write unit and integration tests for the PHP part. PHPUnit is run in the tests instance provided by wp-env.
To run the full test suite, you can use the following command:
npm run test:phpTip: Add the --silent/-s argument to reduce the noise when running commands via npm.
You can also just run test for a specific function or class by using something like this:
npm run -s test:php --args="--filter=AMP_Theme_Support"Note that you should pass any additional arguments to PHPUnit via the --args as presented in the example above.
To run PHPUnit tests with Xdebug running:
npm run -s test:php:xdebugSee npm run test:php:help to see all the possible options.
Jest is used as the JavaScript unit testing framework.
To run the full test suite, you can use the following command:
npm run test:jsYou can also watch for any file changes and only run tests that failed or have been modified:
npm run test:js:watchSee npm run test:js:help to get a list of additional options that can be passed to the test runner.
This project leverages the local wp-env tests instance to facilitate end-to-end (E2E) testing using Puppeteer. Note that E2E and PHPUnit tests use different databases. This way they won't interfere with each other.
To run the full test suite, you can use the following command:
npm run test:e2eYou can also watch for any file changes and only run tests that failed or have been modified:
npm run test:e2e:watchWant to run a specific test? Use the Jest CLI options to filter the test suites to be run:
npm run test:e2e -- -t "Template Mode selector on AMP Settings screen"For debugging purposes, you can also run the E2E tests in non-headless mode:
npm run test:e2e:interactiveNote that this will also slow down all interactions during tests by 80ms. You can control these values individually too:
PUPPETEER_HEADLESS=false npm run test:e2e # Interactive mode, normal speed.
PUPPETEER_SLOWMO=200 npm run test:e2e # Headless mode, slowed down by 200ms.
Sometimes one might want to test additional scenarios that aren't possible in a WordPress installation out of the box. That's why the test setup allows for for adding some utility plugins that can be activated during E2E tests.
For example, such a plugin could create a custom post type and the accompanying E2E test would verify that block validation errors are shown for this custom post type too.
These plugins can be added to tests/e2e/plugins and then activated as part of the E2E test.
The following script creates a post in order to test support for WordPress media and embeds:
npm run wp eval-file wp-content/plugins/amp/bin/create-embed-test-post.phpAfter running the script, go to the URL that is output in the command line.
The following script adds an instance of every default WordPress widget to the first registered sidebar:
npm run wp eval-file wp-content/plugins/amp/bin/add-test-widgets-to-sidebar.phpAfter running the script, there will be a message indicating which sidebar has the widgets. Please visit a page with that sidebar.
The following script creates a post with comments in order to test support for WordPress comments:
npm run wp eval-file wp-content/plugins/amp/bin/create-comments-on-test-post.phpAfter running the script, go to the URL that is output in the command line.
The following script creates a post with all core Gutenberg blocks:
npm run wp eval-file wp-content/plugins/amp/bin/create-gutenberge-test-post.shAfter running the script, go to the URL that is output in the command line.
The file class-amp-allowed-tags-generated.php has the AMP specification's allowed tags and attributes. It's used in sanitization.
To update that file, perform the following steps:
-
cdto the root of this plugin - Run
./bin/amphtml-update.sh(orlando ssh -c './bin/amphtml-update.sh'if using Lando). - Review the diff.
- Update tests based on changes to the spec.
- Commit changes.
This script is intended for a Linux environment like VVV or Lando wordpressdev.
To create a build of the plugin for installing in WordPress as a ZIP package, run:
npm run build:prodThis will create an amp.zip in the plugin directory which you can install. The contents of this ZIP are also located in the build directory which you can rsync somewhere as well if needed.
You can also build the plugin in development mode (for unminified scripts and styles):
npm run build:dev